Wednesday, March 30, 2011

Craft Junkie Too Easter Design Team Post

This is my 2nd post today. Be sure to scroll down to check out how I used balsa wood on a card for my Creative Critterz Imaginations Design Team project!


It's design team day over at Craft Junkie Too, and today we're sharing some fun Easter projects! For my card, I used my Gypsy to weld together two 5 1/2" eggs from the Easter cartridge. I cut a third egg at the same time and adhered it to the front of the card so that the fold wouldn't show. I heat embossed a background image on the top blue layer to give it a little more interest.


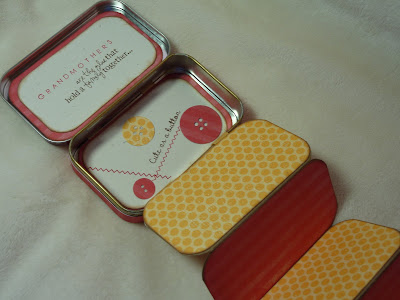
My felt flowers were cut in the Cuttlebug with dies from Papertrey Ink, as were the tag and the button. My sentiment is from My Creative Time's Color Me Happy stamp set.

Recipe:
(all materials Papertrey Ink, unless otherwise specified)

Hawaiian Shores, Harvest Gold, and Rustic Cream Cardstock
"Background Basics: Twinkle" Stamp Set
Versamark Dazzle Ink
a la mode Clear Embossing Powder
My Creative Time's "Color Me Happy" Stamp Set
Hawaiian Shores Ink
Harvest Gold & Raspberry Fizz Wool Felt
"Tiny Tags" & "Buttoned Up #2" Dies
Harvest Gold Topnotch Twill Ribbon
Rustic Cream Button Twine
ColorBox Cat's Eye Chalk Ink

Be sure to stop by Craft Junkie Too to check out what Tracy, Cheryl, and Amber have created for you today!

Tuesday, March 29, 2011

Balsa Wood with the Imagine


I tried a new technique for my Creative Critterz Imaginations design team post today. Last week on her blog, Raspberry Suite, Dawn McVey demonstrated stamping and die cutting balsa wood. I loved the look, and it made me wonder if I could run balsa wood through the Imagine. I haven't worked up the nerve to try cutting the balsa wood with the Imagine, but I was easily able to print on it. My image and the pattern that makes my background paper are both from the Better Together Imagine cartridge. After printing, I ran the balsa wood through my Cuttlebug with a Papertrey Ink die.


I love the rustic look of the balsa wood! See my video below to see how to use this technique.


Papertrey Ink Rustic Cream & Dark Chocolate Cardstock
White Bazzill Cardstock for Imagine Cuts
Balsa Wood (from Joann Fabrics)
Papertrey Ink Mat Stack 4 & Buttoned Up #2 Dies
Papertrey Ink Vintage Cream Coaster
Papertrey Ink Rustic Cream Button Twine
Papertrey Ink Dark Chocolate Ink
ColorBox Cat's Eye Chalk Ink
Sakura White Gelly Roll Pen

Winner of My Creative Time Blog Hop!

Hello! I just wanted to pop by to announce the winner of the My Creative Time Blog Hop! Each of us along the hop is choosing one winner who will be entered into the drawing for the grand prize of all four of Emma's new stamp sets. However, Emma also decided to give each of the individual winners her exclusive stamps (Crafty Goddess & Creative Genius)!

The winner on my blog is "The EmBellished Card - Belinda". Congrats, Belinda! I've sent your email address to Emma. Thanks to the rest of you for joining our hop!

Monday, March 28, 2011

Too Cool Layout


The Weekly Challenge for the Circle Blog this week is to create a "Just Because" layout or card. I used these pictures of Eric when he was four and thinking he was too cool in his star shaped sunglasses. I started with a piece of patterned paper from the DCWV Summer Dream Stack. I then cut a 12"x 7" light green strip to go across the middle, and layered it with the reverse pattern of my background sheet.


My "Too Cool" title is cut at 2.5" from the Boys Will Be Boys layout. The red star is also cut at 2.5" from Create a Critter, and is run though the Cuttlebug Polka Dots Embossing Folder.


This funny robot is cut at 4" from the Robotz cartridge, and his road is made from welding together two 1.5" roads from Everyday Paper Dolls. I cut it once in black, and then a second time in yellow, but hiding the cutouts with my Gypsy. The swirly star is cut at 1.5" from the Gypsy Wanderings cartridge, and the yellow one is cut at 2.5" (not real dial size) from Create a Critter. I ran it through the Swiss Dots Cuttlebug folder.


The second robot is cut at 3" from the Robotz cartridge. The little piece that he is layered upon is cut at 4.25" from the Don Juan cartridge and run through the Spots and Dots Cuttlebug folder. Lastly, my journaling tag is cut at 2.5" from Robotz.

Recipe:

DCWV Summer Dream Stack
DCWV Neutrals Stack
Core'dinations Cardstock
ekSuccess Circles Large Edger Punch
Cuttlebug "Swiss Dots", "Polka Dots", and "Spots and Dots" Cuttlebug Folders
ColorBox Cat's Eye Chalk Ink
Zig Writer

Sunday, March 27, 2011

Postmarks Card

Click here for the My Creative Time Blog Hop.


Today I have a card that I made with my new Papertrey Ink stamp set, "Postmarks." I think this will be a really fun set for making vintage style cards. My "postcard" is cut at 3" x 4". I used my Corner Chomper to round out the corners and then distressed the edges before inking it up. The cute stamp was made with the Postage Stamp die and more stamps from this set. For my text, I used "Background Basics: Text Style II" and just inked up enough of the stamp to fit on the left hand side of the postcard. Finally, I made the little tag with the "Tiny Tags" stamps and die.


Recipe:
(all materials Papertrey Ink)

8 1/2" x 5 1/2" Kraft Cardstock, scored at 4 1/4"
5 1/4" x 4" Rustic Cream Cardstock
5" x 3 3/4" Patterned Paper from the "Turning a New Leaf" Collection
"Postmarks" and "Tiny Tags" Stamps
Ripe Avocado, Smokey Shadow, Summer Sunrise, & Dark Chocolate Ink
"Postage" and "Tiny Tags" Dies
Rustic Jute Button Twine

Saturday, March 26, 2011

Special Request Card

If you're looking for the My Creative Time Blog Hop, just scroll down to the next post.

A friend of mine asked if I would make a card for her mom. She and her brothers are giving her the gift of a new patio, and they needed a card to let her know about it. This is a 6" square card. I first printed a 5.5" square of cloud patterned paper from the Best Friends cartridge on the Imagine. The tree is cut at 5", using the Imagine More cartridge for the green gingham pattern. The table, cut at 2.65", is from the Camp Out cartridge, and the grill, cut at 2.3", is from the From My Kitchen cartridge. Lastly, I cut the flowers in the vase at 1.5" from Kate's ABCs.

To make the grass, I printed a rectangle with the same Imagine More pattern, and then trimmed it with my Martha Stewart Icicle Punch. I didn't have any good paper for a patio, so I searched online and found some free printables at "Outdoor Fun Scrapbook Graphics." I just used my Scor-Pal to make it look like tiles.

Recipe:

DCWV Playtime Stack
Core'dinations Cardstock
Bazzill White Cardstock (Imagine Cuts)
Papertrey Ink Pretty Pastels Patterned Paper Stack (pitcher)
My Creative Time "Mom You ROCK" Stamp Set
Papertrey Ink Double Ended Banner Die & Dark Chocolate Ink
Martha Stewart Icicle Punch
ColorBox Cat's Eye Chalk Ink

Friday, March 25, 2011

My Creative Time Blog Hop


Welcome to the My Creative Time blog hop, showcasing Emma's brand new stamps! Today I am showcasing the "Fun Borders" stamp set. This is such a cute one! I stamped my border on a light blue background four times with Versamark and then embossed it with clear embossing powder. I think this makes a fun homemade patterned paper!


Next I made a 3.5" pocket card using the Sweethearts cartridge. I ran the envelope through the Birds and Swirls Cuttlebug folder and embellished it with champagne glasses cut at 2.5" from Sweethearts. For my pull-out sentiment, I used another new stamp set from My Creative Time, "My One and Only". Because this is one long stamp, and I needed something shorter for my little card, I stamped each word separately, covering the unwanted word with scotch tape when I inked it up.


Recipe:

8 1/2" x 5 1/2" Papertrey Ink Enchanted Evening Cardstock, scored at 4 1/4"
5 1/4" x 4" Papertrey Ink Kraft Cardstock
5" x 3 3/4" Papertrey Ink Spring Rain Cardstock
Papertrey Ink Rustic White Cardstock
Core'dinations Cardstock
Cuttlebug Birds and Swirls Embossing Folder
My Creative Time "Fun Borders" & "My One and Only" Stamp Sets
Versamark Ink
a la mode Clear Embossing Powder
Papertrey Ink Dark Chocolate Ink
ColorBox Cat's Eye Chalk Ink
Papertrey Ink Rustic Jute Button Twine

Click here for ordering information for the Fun Borders stamp set.

If you just happened upon this hop, be sure to start back at Emma's blog, so you don't miss anything! All of the My Creative Time designers have projects for you, as well as Joy and Melanie from Everyday Cricut! Leave a comment at ALL of the stops, and you might win all four of the new My Creative Time stamp sets, plus a super cute "exclusive" stamp set that is not sold separately! Your next stop on the hop is the terrifically talented Glora!

Thursday, March 24, 2011

Sweet Little Princess


Today I'm showcasing one of My Creative Time's brand new stamp sets, "All Star Baby." It is so cute! It also gave me an excuse to play with the adorable Kate's ABCs Cricut cartridge. This cut is 4". There are lots of little layers, so I decided to go bigger and make an A7 size card. My clouds background paper is printed on the Imagine with the Best Friends cartridge.


Be sure to stop by My Creative Time to see what fabulous projects the rest of the team has created for you today. Also, click here for ordering information for the "All Star Baby" stamp set!


Recipe:

10" x 7 1/8" Papertrey Ink Dark Chocolate Cardstock, scored at 5"
4 3/4" x 6 7/8" Papertrey Ink Harvest Gold Cardstock
4 1/2" x 6 5/8" White Bazzill Cardstock for Imagine print
Core'dinations Cardstock
Papertrey Ink Pretty Pastels Patterned Paper Pack
Cuttlebug Swiss Dots Embossing Folder
Papertrey Ink Double Ended Banner Die & Dark Chocolate Ink
My Creative Time's "All Star Baby" Stamp Set
Imaginisce Gems
Papertrey Ink Harvest Gold Topnotch Twill Ribbon
ColorBox Cat's Eye Chalk Ink

Tuesday, March 22, 2011

Altered Frame with the Imagine


For my Creative Critterz Imaginations design team post this week, I created an altered frame to display one of my favorite pictures. Can you believe I found this frame for $1 at Michael's? Such a bargain! I began by printing a 6.5" rectangle (5:7 ratio Imagine stock rectangle), flood filled with a striped pattern from the Imagine More cartridge. I then traced my frame on the paper, cut it out, and used Mod Podge to adhere the paper to the frame.


The picture is of my son on the beach in San Diego from a trip we took a few years back. It was such a wonderful relaxing trip, that I knew I needed the word "relax" to capture the moment. I cut it at 4.8" from the Life Is A Beach cartridge, flood filling it with another Imagine More pattern. The word comes attached to a chair, but I just trimmed it off. To make the cloud from Create a Critter, I used my Gypsy to size it at 5.04" x 2.17" and then cut it out of Rustic Cream cardstock on the Imagine. I also ran it through the Divine Swirls Cuttlebug folder.


The 3.5" adirondack chair, from Life Is a Beach, was also cut out of the Rustic Cream cardstock, but I flood filled the layers with turquoise from the Imagine More cartridge.


Lastly, the flip flops were cut at 2.2" from Life Is A Beach, again using patterns from Imagine More.

Recipe:

Michael's Frame
Bazzill White Cardstock (for Imagine cuts)
Papertrey Ink Rustic Cream Cardstock
Cuttlebug Divine Swirls Embossing Folder
ColorBox Cat's Eye Chalk Ink

Sunday, March 20, 2011

Lots of Candles!


I was trying to make a birthday card that would be good for a guy, but I think think this one could be good for anybody! My candles are from the Wrap It Up cartridge, cut at 3.5".


The adorable sentiment is from My Creative Time's "Wow! So Many Candles" stamp set. Click here for ordering information:


Recipe:
(all materials Papertrey Ink, unless otherwise specified)

8 1/2" x 5 1/2" Aqua Mist Cardstock, scored at 4 1/4"
4" x 5 1/4" New Leaf Cardstock
3 3/4" x 5" Patterned Paper from Library Ledger Patterned Paper Collections
Green Boutique Patterned Paper Collection
Harvest Gold & Summer Sunrise Cardstock
My Creative Time's "Wow! So Many Candles" Stamp Set
New Leaf Ink
Rustic Jute Button Twine
ColorBox Cat's Eye Chalk Ink
Sakura White Gelly Roll Pen

Saturday, March 19, 2011

Sweet Sympathy Card


A friend of mine lost her father this week, and I wanted to make her a special card. I think the embossing from the Stylized Flower Cuttlebug Folder is so pretty, so I didn't want to cover up too much of it.


My tag is cut at 2.88" from the Tags, Bags, Boxes & More Cricut cartridge. The sentiment label is also from this cartridge, but I used my Gypsy to change the base size to 2.38" x .75" and the shadow to 2.55" x 0.96". I used the "hide contour" feature to remove the slits in both. My little swatches of paper behind the label were created with the swatch die from the Papertrey Ink Button Card die set.


For the inside, I used the Papertrey Ink "With Sympathy" stamp set for my sentiment and butterfly. This is a great set for sympathy cards - lots of phrases when you have a hard time finding the right words.

Recipe:
(all materials Papertrey Ink, unless otherwise specified)

8 1/2" x 5 1/2" Kraft Cardstock, scored at 4 1/4"
5 1/4" x 4" Royal Velvet Cardstock
5" x 3 3/4" Rustic Cream Cardstock
Cuttlebug Stylized Flower Embossing Folder
"Button Card" Die
"Asian Fusion" Stamp Set
"With Sympathy" Stamp Set
"Bitty Background Basics" Stamp Set
Plum Pudding & Dark Chocolate Ink
ColorBox Cat's Eye Chalk Ink
Michael's Button
Rustic Cream Button Twine

Thursday, March 17, 2011

PTI Make It Monday Challenge


This week's "Make It Monday" Challenge for Papertrey Ink is to partially emboss an element. For my card, I began by using Mat Stack 1 to die cut my purple cardstock, and then I used the Tin Types Impression Plate to emboss the top of it and the bottom, leaving a space in the middle for my sentiment.


The buttons were stamped with a stamp from "Bitty Background Blocks", using Versamark ink and embossing with clear embossing powder.


For my background, I used the little swatch die from the Button Card die set to cut swatches from Rustic White cardstock. I stamped them with stamps from "Bitty Background Blocks" using Hawaiian Shores ink. After inking around the edges, I laid them out on a piece of 3 3/4" x 5" Royal Velvet cardstock and then trimmed the excess off the edges with an X-Acto knife.

Recipe:
(all materials Papertrey Ink, unless otherwise specified)

11" x 4 1/4" Hawaiian Shores Cardstock, scored at 5 1/2"
4" x 5 1/4" and 3 3/4" x 5" Royal Velvet Cardstock
Rustic White Cardstock
Tin Types Impression Plate
Mat Stack 1, Button Card, Button Die 1, and Flower Fusion #1 Dies
"Bitty Background Blocks" & "Signature Greetings" Stamp Sets
Hawaiian Shores, Chamomile, & Versamark Ink
White Filigree Embossing Powder
a la mode Clear Embossing Powder

Tuesday, March 15, 2011

You Are Appreciated


For some reason I thought it would be cool to make background paper with a brick pattern. It was a little time consuming, but I like the way it turned out. To make this, I first looked online for images of bricks until I found a pattern that I liked. I then used my Imagine More Cards cartridge to cut out a 4" x 6" red polka dotted rectangle. I cut this into 1" x 1/2" bricks. After inking around their edges, I adhered them to a 3 3/4" x 5" piece of Kraft cardstock. Here is what it looked like before I used an X-Acto knife to cut off the extra parts.


And the back...


The apple was cut from the Preserves cartridge at 2", using patterns from the Imagine More cartridge. The sentiment tag is cut at 1" from the Best Friends cartridge, using a pattern that I cached from the Imagine More cartridge. I heat embossed the sentiment, which is from My Creative Time's adorable "So Grateful for You" Stamp Set.


Recipe:

8 1/2" x 5 1/2" Papertrey Ink Kraft Cardstock, scored at 4 1/4"
4" x 5 1/4" Papertrey Ink Summer Sunrise Cardstock
3 3/4" x 5" Papertrey Ink Kraft Cardstock
Bazzill White Cardstock for Imagine Cuts
My Creative Time's "So Grateful For You" Stamp Set
White Filigree Embossing Powder
Versamark Ink
Papertrey Ink Rustic Jute Button Twine & Button
Color Box Cat's Eye Chalk Ink

Monday, March 14, 2011

Family Scrapbook Page


We had a drizzly Sunday here - a perfect day for some scrapbooking. I recently saw a couple of Jana Eubank's videos on the Cricut Circle Blog. They are great for people like me, who scrapbook, but don't really know what they're doing. I kind of modeled this layout after one of hers, where she explained how to use the visual triangle rule and add texture and depth with some dimensional embellishments (sewing, in this case).


I used my Gypsy to design this layout. The circles are from the Cricut Classic Font cartridge, but I didn't keep track of the sizes. For my journaling, I used part of a stamp from My Creative Time's "My Journaling."


I meant to make a rug to put under the chair and table, but I totally forgot. Oh, well. The chair is from French Manor, cut twice at 3.5" and layered. The table is cut at 2.5" from Kate's ABCs, and the books are cut at 1" from Locker Talk. All of those were run through the Cuttlebug with the Papertrey Ink Woodgrain Impression Plate. "Family" is cut at 2" from Gypsy Wanderings.

Recipe:

DCWV Summer Dream Stack
DCWV Neutrals Stack
Papertrey Ink Dark Chocolate and Vintage Cream Cardstock
Papertrey Ink Woodgrain Impression Plate
My Creative Time "My Journaling" Stamp Set
Papertrey Ink True Black Ink
ColorBox Cat's Eye Chalk Ink

Sunday, March 13, 2011

Grandma's Brag Book


Ever since Mary, on CardzTV, posted a video on making a mini album in an Altoids tin, I've been dying to try it. I thought this would make a cute little birthday gift for my mom. She can put pictures of her eight grandchildren in it and easily carry it in her purse to share with her friends.


For the sentiments on the lid and the inside cover, I used My Creative Time's "Mom You ROCK" stamp set. These two sentiments originally had the word "Moms" in them, but I covered that with scotch tape when I inked it up, and then I spelled out "GRANDMOTHERS," using the Simple Alphabet stamp set from Papertrey Ink.


There are twelve empty pages for pictures, by using the front and the back. To see how to make this mini album, visit CardzTV, to see Mary's video.


Recipe:
(all materials Papertrey Ink, unless otherwise specified

Altoids Tin
DCWV Summer Dream Stack
Distressed Dots Patterned Paper Collection
Vintage Cream Cardstock
My Creative Time's "Mom You ROCK" Stamp Set
"Simple Alphabet", "Button Boutique", and "Flower Fusion #1" Stamp Sets
Dark Chocolate, Pure Poppy, & Ripe Avocado Ink
"Buttoned Up #1" and "Flower Fusion #1" Dies
Summer Sunrise Topnotch Twill Ribbon

Saturday, March 12, 2011

Masculine Get Well


I often find it hard to make a masculine get well card. However, I thought this cut from the Imagine More Cards cartridge worked pretty well. I just updated my Gypsy and Imagine so that they work together now. It's really nice to have my Imagine cartridges on the Gypsy and be able to design from there. For this card, my scalloped circle base is from the Wrap It Up cartridge, cut at 4.25", but I "hid" the onesie that would be cut out from it. I cut my image from the Imagine More Cards cartridge at 3.9" in layers and attached the whale with an Action Wobble.

Recipe:

Hawaiian Shores Papertrey Ink Cardstock
White Bazzill Cardstock for Imagine Cuts
Action Wobble
Color Box Cat's Eye Chalk Ink

Friday, March 11, 2011

Crafty Kids


Some of my third graders have been watching YouTube videos on creating items with duct tape, and they have been bringing me all sorts of fun little gifts. I was so impressed with them that I asked if I could share them on my blog. First, Kirk made this vase of flowers above, and then this cool wallet below. It even has slots for my credit cards!


Grace made this very pretty card with a rose, and a fun ball!


Sophie made a colorful tray that I can use for all sorts of things. She even included some beautiful bows and a pretty pen for me to use!


Last, but not least, Khristina made me this very fashionable purse and some pretty bracelets.


Can you believe that all of these are made from duct tape? I never even knew you could buy it in all of these cool colors and patterns! I'm also excited to be teaching kids who share my love of crafting!

If you are interested in making duct tape flowers for your cards, check out this video by my friend Linda, from The Paper Boutique: