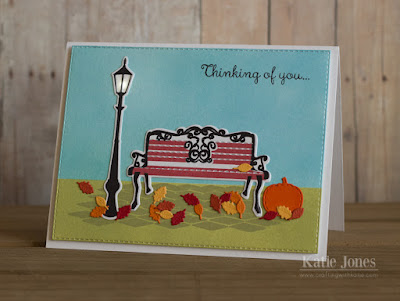
I have a fun project for you today! I was recently contacted by AgIC, a company that is exploring "digital paper craft," a fusion of technology and crafting on paper circuits using conductive inks. I used their Circuit Marker Starter Kit to give the streetlamp on my card an actual glowing light!
First, let me share how I put together the front of this card, and then I'll get into the technical aspects. I used all My Creative Time stamps and dies, and got started by cutting a white rectangle using the largest Stitched Rectangular Die. I also die cut and stamped the streetlamp and bench from Wishing You Were Here, and stamped the brick pattern from this stamp set onto the rectangle. I then positioned the streetlamp and bench onto the card to get an idea of my layout. I knew I was going to be inking the sky blue, but I didn't want there to be blue behind the top of the streetlamp, so I made a little mask with masking paper and put it just in the right spot. Then I removed the die cuts, and got to work inking the sky and the grass. I was then able to adhere the streetlamp and have white behind the openings instead of blue (so white light would shine through later). I also added a pumpkin from All Around Holidays, lots of leaves from Seasonal Greetings, and a sentiment from Wishing You Were Here.
AgIC sent me the Circuit Marker Starter Kit, which you can get from Amazon if you click on the link at the bottom of this page. It comes with very clear instructions and a sample card to try out and get a feel for the process. What you see in the picture above is the beginning of what I made to go behind the colorful panel on my card. The main thing I had to figure out was exactly where I wanted my LED light to go, measuring from the corner of the rectangle, and then marking that same measurement on the circuit paper. Then, the kit includes a stencil that is used to draw the semi-circle pads for the LED tag (at the top) and the circles for the coin battery (at the bottom). Ignore that little piece of aluminum tape; I had started to tape down the battery when I decided to take the picture. Then you just connect them. To make the LED light up, you need a complete circuit, so the electricity can travel around. The pen has silver ink, which is what lets it do this. It doesn't matter how you draw it, as long as it makes a complete circuit once the LED and battery are part of it.
The LED has adhesive on the back, so you just stick it down. The battery gets taped down with a bit of aluminum tape, which is included. There are actually 4 different colors of LEDs in the kit, and you can use more than one on a card, by making parallel circuits. It's really easy! Once I had my circuit completed, I adhered the circuit paper to my card base, and then adhered my decorated rectangle on top of it, with some foam tape.
Here's a closer look at it in action. So cool, right? According to AgIC, the LED will stay lit for about a week. Click here to learn more about AgIC, or here to visit the community site!
Products used on this card:


Very cool! Lucky you to get to try something new! Fun!
ReplyDeleteThis is super cool Katie...love the card too!!!!
ReplyDeleteWas unable to find out how to turn off circut to mail card, if that is possible or not, and if not how long does battery last. Product website was not very helpful. I will try to email them. Thanks
ReplyDeleteThis is AWESOME Katie!! LOVE your spotlight on this fun new product!!!
ReplyDeleteSuper job!!!!
How fun to have a card that lights up! Your scene is so pretty...I like the sprinkle of colorful leaves and the pumpkin. Great job on the tutorial too.
ReplyDeletequilt 4 fun 2 at hot mail dot com
That is really neat ...
ReplyDelete